Friday 31 May 2013

Does My Computer Need Upgrading?

I am going to tell you how to check if the computer needs upgrading, to see if it needs upgrading i have used the task manager and this will tell me if it needs upgrading.

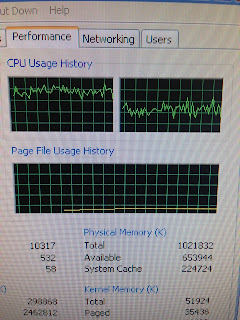
For this I am going to log on to a computer then i am going to open lots of programs and software's to make the computers performance a bit slow and then I am going to press CTRL + Alt + Delete and then this will open up the task manager, click on performance tab and it will show me a graphical image on how much memory and other system resources that are in use.


After this click of the task manager and do other stuff on the computer like word and mess about with it and if the graphical image moves about or makes spikes then this will indicate that your computer needs more memory.


My Improvements
RAM
This shows to me that it keeps on getting more and more programs that are open and the more and more that are open the more lines come that have spikes, so the more programs that are open the more slower the computer gets. 

If this was my computer I would want to make it run all the programs at once with out the performance of the computer slowing down and so it does not lead to a crash or interrupt any of my work. It is running lots and lots of memory but it shows that the memory is less and it needs upgrading. If it was my computer i would put more RAM in the computer so it will work.

If you do put more RAM on the computer make sure this has lots of it so when you do have lots of programs and software open there will be more memory available than there should be total. This will not crash or interrupt any of your work. To install a RAM you can buy it from online for about £40 pound it has 8 GB on it and they have upgrades on them like 3d frag tests with out laggy disk swapping, more memory to do more multitasking,  you can open lots of high resolution photos open and lots more and install it yourself i have put a video off it up on this blog.

Hard Drive
I would also upgrade the hard drive, if the hard drive has lots of spaces on it then it can be looked at more faster and more easier, the higher the GB the better it will be. I would suggest buying the Samsung 840 pro, this is a really good upgrade and it is only 7 mm thin and 2.5 inch of a design, it has a new controller inside and toggle mode NAND for the flash memory and offers a much more better combination for performance and it is energy efficient on the market. It has 512 GB capacity. it supports Windows, Mac and Linux. It has a 4 start rating and they normally cost around £219. This would be such a better upgrade and if you need to install the hard drive you can do it yourself i have a video on this blog showing you how to.

Operating System (windows 8)
Upgrading to a better operating system would be a good option because you have all the updated software and programs on it, it will run faster and smoother and more efficiently. This will have a better battery life for longer use and have a massive security improvements if you are a user that buys lots of things on the internet. If you like using touch then windows 8 would be the best for you because it was designed for touchscreen, it would be faster for you to use. To install windows 8 you would need 1 GB RAM and a 20 GB of hard drive space. you can get all this for cheap too from amazon, a really good upgrade for just £49.50, you can upgrade from windows XP, vista and windows 7. If you want to upgrade your operating system i have put a video on the blogger for you.

Online Storage

How to Use Online Storage

Online storage is now new in the Industry, Companies are now introducing this new feature. It can be used on phones and nearly everywhere else. The good thing about online storage is that wherever you are you can  use it. You can used 100's of different computers and still be able to download your file. If you have a file that needs uploading I have shown you how to do this below.

Online storage is good because a computer can just break at any point at any time and your important hard work files will have been deleted or destroyed. Online storage is there and it will always be there for back up.

I am going to show you an example using Drop Box. Drop Box gives you 2GB of allowance for free, more space can be purchased or you can get another 1.25GB for free if you introduced to a friend or download the software.

Step 1) Log on/Sign up at www.Dropbox.com


Step 2) Click on the Upload Button


Step 3) Choose the file that you need to upload and its done


Thursday 25 April 2013

Replacing Damaged Components

Replacing Consumables

Printer Paper

The printer paper only takes 3 seconds to do. I have put some pictures below if you get stuck.


There will be a part where you can put your papers, depending on what kind of paper it is.

You should know if there is paper because on the printer the light should be green, if there is no paper then the light will be red.


Cleaning Hardware

I am going to show you how to clean the monitor so you can get rid of all the dirt safely. All you need is to buy a screen cleaner they normally cost around £1-£2.

Step 1) Spray the screen cleaner on your monitor.


Step 2) wipe all the dirt off the monitor with a cloth.


Deleting Temporary Files

Deleting temporary files will delete all the previous websites that you have visited and all the caches, stored passwords and the cookies etc. You can do this by following simple steps, it is done quickly, i have made a video below to show you if you get stuck

Step 1) Click on Start and open Control Panel

Step 2)  Click on Network and Internet and then click Delete Browsing History and Cookies

Step 3)  under browsing history click on delete, click on all the things you want to clear and click delete.


Archiving

Defragmentation

I am going to show you how to archive files that are not needed from your computer. I have put a  video below and it should be done easy steps.

Step 1) Click on Start, Control Panel and then Performance and Maintenance.
Step 2) The click on 'Rearrange items on your hard disk to make programs run faster'
Step 3) Click on your hard drive it will be under volume. (C:) file.
Step 4) Then click Defragmentation.
Step 5) View the report of how your computer is doing.


Automatic scheduling and Deletion of Unwanted Data

I am going to show you how to do a automatic scheduled and deletion of unwanted data,
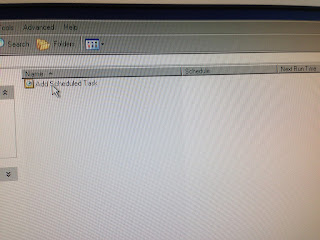
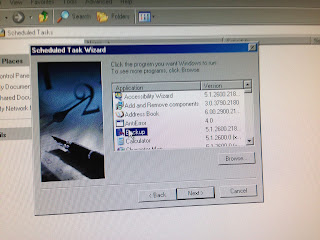
I have provided pictures below to show you how to do it.

Automatic Scheduling

Step 1) Click on Add Schedule Task


Step 2) Read the Information and Click Next.


Step 3) Click on Backup and click Next.


Step 4) I like to do mine Daily, but you can choose what you want, click on One and click Next.


Step 5) Choose a Time and date then Click Next


Step 6) Enter your username and password and click next, then finish and you should see another file thats been added called backup.


Deletion of Unwanted Data


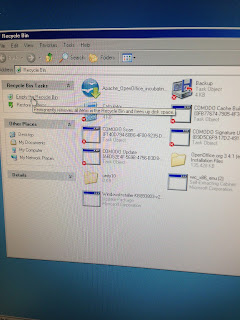
I am going to show you how o delete the files that you do not need this is done in three easy steps.

Step 1) click Recycle Bin


Step 2) Click Empty Recycle Bin


Step 3) Click Yes


Back Up Procedures

Back Up Procedures 


I am going to show you how to back up files that you need. This will store the files in a safe place. I have put a video down below to show you. I have also included steps to help you as a guide.

Step 1) Click on Start, Control Panel and then Performance and Maintenance.
Step 2) Click on 'Back up your Data'
Step 3) Click Next and then again press Next, You will have to then choose a place of where to put the back up file.
Step 4) Then Just click next and wait for the back up files to be completed.


Organizing and Renaming Files

I am going to show you how to organize and rename files, this is really easy and is done in a few steps. I have made a video down below to show you how to rename and sort files out

Renaming Files
Step 1) Go to Documents or wherever you want your file is to be Renamed
Step 2) Click on the File you want to rename and then right click and click on Rename.
Step 3) It should now be highlighted, you can now input what you want to rename the file
Step 4) Click Enter When Finished


Organizing
Step 1) Go to Documents or wherever the files is that you to Organize.
Step 2) Click on an empty space in the folder you want to Organize and then Right Click and click on View
Step 3) Edit how you want to view it. You can even sort it by A to Z.


Testing Functionality (Time & Date Set, Printer Paper Size)

Correct Time and Date Set

I am going to show you how to change the date and time, this is simple and fast to do. If you struggle with it then I have made a video below. Follow the steps. You can also change the format of the way yo want the date to be displayed.

Step 1) On the bottom right hand screen there is a time, click on this.

Step 2) Click on Change date and time.

Step 3) change the date or time to correct time zone.


Correct Paper Size for Printer


Correct Device Drivers Are Installed

To check how to check if the device drivers are installed all you have to do is follow a few simple steps.

I have put a video below to show you how to do it.

Step 1) Click on Start

Step 2) Click on Device and Printers

Step 3) See what is installed and see if its working properly.


Create and Reconfigure Application toolbars

I am going to show you how to go create new tool bars and change them, you can add or remove them.
I am going to use Google chrome to do this, on other explorers it is similar. If you do not know how to do this I have put a video down below.

Step 1) Open Google Chrome

Step 2) Click on Customize and control google chrome

Step 3) click on settings and then click on extensions and change it to what is suitable for you.


How To File Share

I am going to show you how to set up file sharing, File sharing is where you can get other users to access your files. if you follow these steps you can get it turned on here. I have added a Video down below to help you out easier.

Step 1) click on start and go to Control Panel.
Step 2) Click on 'Choose Home Groups and Sharing Options'
Step 3) Click on 'Change advanced Sharing options'

You have now came to the page where you have a list of options you will have options here if you want your network to be discovered, file and printer sharing & Public folder sharing.  There will be a turn on and Turn off button. If you want something to be shared you will have to make sure it says Turn on.


Start up options RSI

This does  look a bit tricky because no one has used a run box before so i have put a video down below too.

Step 1) Press windows button and then type in the box 'Run'
Step 2) A program called 'Run' Will pop up, click on it
Step 3) In the Run Box type In 'MSCONFIG'
Step 4) There will be a start up box make sure it is ticked.
Step 5) There are other tabs on there, one will be called 'Start up' every option that you need make sure it is ticked, the options that you don't need make sure it is not ticked
Step 6) When you are done click apply to save the settings and then OK, it will ask to restart now or restart later, choose the option you want, After it has restarted the options will be done.


Desktop Editing Visual Impairment

Here I am going to show you how to change three things, I am going to show you how to change the Font Size, Icon Size and the color. They are really easy to do and i have made a video for each of them. They are all in the same settings.

Icon Size


I am going to show you how to change the Icon size, This is done easily. to change them follow the steps below.

Step 1) go on the desktop
Step 2) Click on View
Step 3) choose whether you want small, medium or large Icons and it will change automatically.


Font Size

The font size is quick and simple to change, you can change it to see what you can read.

Step 1) go on the desktop, Right click and go open Personalize. (in your computer it might be Properties)
Step 2) Click on Display and then on the left hand side click on Set custom Text Size
Step 3) Drag the ruler and the correct the right option for your eye sight and then click ok.
Step 4) if your happy with your change then click Apply. There are other options you can choose, there is medium or if you want it to get it back to normal click Smaller.
Step 5) It will Ask you to Log off now or Log off Later, after you have logged off this changes will occur.


Color

The color is easy to change too, you can make the change to what is suitable for you.

Step 1) Go on the Desktop, Right Click and go on Personalize. (In your computer it could be Properties)

If you want to change the theme you can change it to make it suitable for you, this will also change the icons and the color
.
 Step 2) choose a Theme
Step 3) Click on Display and then Calibrate color.
Step 4) Follow the steps, too change the brightness go back and click on Add brightness. (If you have a laptop you can use the keyboard to do that)


Edit Anti-Virus Configurations

If you have an Anti-Virus and you want make it search your computer for viruses and other settings then follow these footsteps. I have made a video so you can see how its done. You can set it too search for virus every time you log on, daily, weekly and monthly.

If you need an antivirus then i have made other posts on how to download one.

Step 1) Open the antivirus

Step 2) Click on Security

Step 3) Scroll all the way down to the bottom and click on Create Custom Scan

Step 4) You will have to now fill in the details of what you want, name of the anti virus, what you want it to scan, when you want it to happen, Defragmenation and slow or fast speed etc.


Edit BIOS Configuation

I am going to show you how to change some settings on your BIOS this is done easily. You can set passwords here, change the memory settings, Change what drive to run etc. I have provided a video below to show you what to do.

Step 1) Start the computer and when prompted Click F2.
Step 2) Scroll through the settings and change what needs changing.


Monday 7 January 2013

Create Appropriate Directory/Folder Structures

I am going to show you how to create new folders or how to move or sort them out.

This is really simple and fast.

Creating a new folder

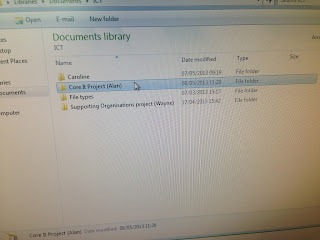
1) Click on start and then go to your documents.
2) go to the folder and you want to add the new folder too
3) click on the top where it says to add a new folder and rename it to what ever you desire.


or

1) Right click where you want to add a new folder and go to new then folder.


You can also sort the folders out, if you want them to go in order by name just go to sort and then click on name, then ascending. You could sort it by the date, file type or file size too.


If you have a specific file or folder that you want to delete you can delete it two ways. both of the ways are easy.

1) Click on the folder or file you want to delete and press the delete button it will be on your keyboard and click yes.or right click on the file and press delete.


Install and Test Device Drivers

How to Install and Test The Drivers

I am going to show you how to install a device and the test it. I am going to use a USB stick and a laptop.
This video below will show you how to install and test it.


Step 1) plug in the Device.
Step 2) a message will pop up on the right hand side, click on it.
Step 3) a box will appear and it will tell you if the device is ready to use. Enjoy.


Install And Set Up Security Software - Avira

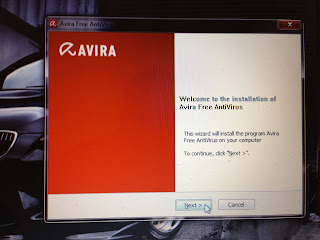
First of all you are going to have to download Avira, I am going to show you on this post how to download and install it. You will have to download it from the internet and it is free of charge and i have posted the link here: http://www.avira.com/en/avira-free-antivirus

Step 1) Download Avira and save it to the desktop, double click it, wait for it to open and then click next.


Step 2) Click on your language, i have chosen English, after this click next.


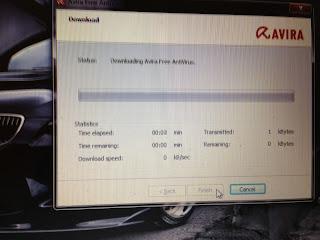
Step 3) After you press next Avira will start downloading to your computer mine took 15 minutes to download.


Step 4) follow the stops and click yes when a box asks you if Avira can be used on your computer.


Step 5) Click on Express, this will install automatically, it will decide how to install it on your computer i would recommend clicking on that and then press next.


Step 6) The next step is if you want to install a toolbar, im happy without one so i unticked the boxes and pressed next and follow steps.


Step 8) Setting it up. After you have installed it. You can open the software and start using it, this is what it looks like. With this you can scan your computer for viruses and make it choose where too search and what to do. Enjoy.