Thursday, 25 April 2013
Replacing Consumables
Printer Paper
The printer paper only takes 3 seconds to do. I have put some pictures below if you get stuck.

There will be a part where you can put your papers, depending on what kind of paper it is.
You should know if there is paper because on the printer the light should be green, if there is no paper then the light will be red.


Cleaning Hardware
I am going to show you how to clean the monitor so you can get rid of all the dirt safely. All you need is to buy a screen cleaner they normally cost around £1-£2.

Step 2) wipe all the dirt off the monitor with a cloth.


Step 1) Spray the screen cleaner on your monitor.

Step 2) wipe all the dirt off the monitor with a cloth.


Deleting Temporary Files
Deleting temporary files will delete all the previous websites that you have visited and all the caches, stored passwords and the cookies etc. You can do this by following simple steps, it is done quickly, i have made a video below to show you if you get stuck
Step 1) Click on Start and open Control Panel
Step 2) Click on Network and Internet and then click Delete Browsing History and Cookies
Step 3) under browsing history click on delete, click on all the things you want to clear and click delete.
Step 1) Click on Start and open Control Panel
Step 2) Click on Network and Internet and then click Delete Browsing History and Cookies
Step 3) under browsing history click on delete, click on all the things you want to clear and click delete.
Archiving
Defragmentation
I am going to show you how to archive files that are not needed from your computer. I have put a video below and it should be done easy steps.
Step 1) Click on Start, Control Panel and then Performance and Maintenance.
Step 2) The click on 'Rearrange items on your hard disk to make programs run faster'
Step 3) Click on your hard drive it will be under volume. (C:) file.
Step 4) Then click Defragmentation.
Step 5) View the report of how your computer is doing.
Automatic scheduling and Deletion of Unwanted Data
I am going to show you how to do a automatic scheduled and deletion of unwanted data,
I have provided pictures below to show you how to do it.
Automatic Scheduling
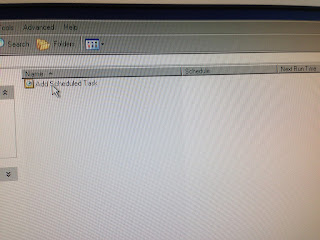
Step 1) Click on Add Schedule Task

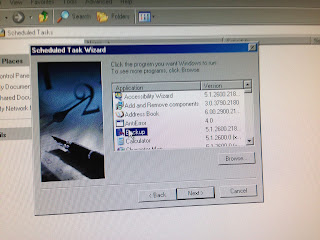
Step 3) Click on Backup and click Next.
Step 4) I like to do mine Daily, but you can choose what you want, click on One and click Next.

Step 5) Choose a Time and date then Click Next

Step 6) Enter your username and password and click next, then finish and you should see another file thats been added called backup.


Deletion of Unwanted Data
I am going to show you how o delete the files that you do not need this is done in three easy steps.
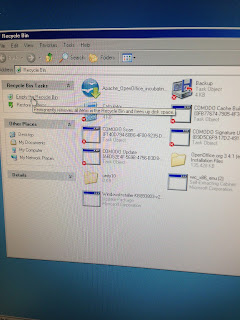
Step 1) click Recycle Bin

Step 2) Click Empty Recycle Bin
Step 3) Click Yes

I have provided pictures below to show you how to do it.
Automatic Scheduling
Step 1) Click on Add Schedule Task

Step 2) Read the Information and Click Next.

Step 3) Click on Backup and click Next.

Step 4) I like to do mine Daily, but you can choose what you want, click on One and click Next.

Step 5) Choose a Time and date then Click Next

Step 6) Enter your username and password and click next, then finish and you should see another file thats been added called backup.


Deletion of Unwanted Data
I am going to show you how o delete the files that you do not need this is done in three easy steps.
Step 1) click Recycle Bin


Step 3) Click Yes

Back Up Procedures
Back Up Procedures
I am going to show you how to back up files that you need. This will store the files in a safe place. I have put a video down below to show you. I have also included steps to help you as a guide.
Step 1) Click on Start, Control Panel and then Performance and Maintenance.
Step 2) Click on 'Back up your Data'
Step 3) Click Next and then again press Next, You will have to then choose a place of where to put the back up file.
Step 4) Then Just click next and wait for the back up files to be completed.
Subscribe to:
Posts (Atom)